Navigation
Navigation Bars
This guide assumes you are already familiar with creating and using Hook files in WHMCS.
There are two navigation bars in WHMCS’s client area. They exist as part of the system theme.
The primary navigation bar contains the bulk of the menu and floats to the left of the secondary navigation bar. The secondary navigation bar contains user-specific items and changes if a client is logged in to WHMCS. When a client is not logged in then the secondary navigation contains a login link, and when a client is logged in then the secondary menu contains links to the client’s account.
Responsive mode is activated when WHMCS’s client area is viewed on a smaller screen device such as a phone or tablet. At that point, WHMCS will collapse the navigation bar into a fold-out menu.
The navigation bar elements are controlled in a programmatically, allowing modules and hooks to dynamically interact with the navigation menu elements.
The look and feel of the navigation bar can be customised via the /header.tpl and /includes/navbar.tpl system theme template files.
Finding a Menu Name
Every menu item has a unique name that is used to reference it. You will need this name in order to manipulate it. To make it easier, we have made the name of each sidebar menu item available in the HTML source of the page, which means it can be retrieved using the Inspect Element option available in most modern browsers. For example:
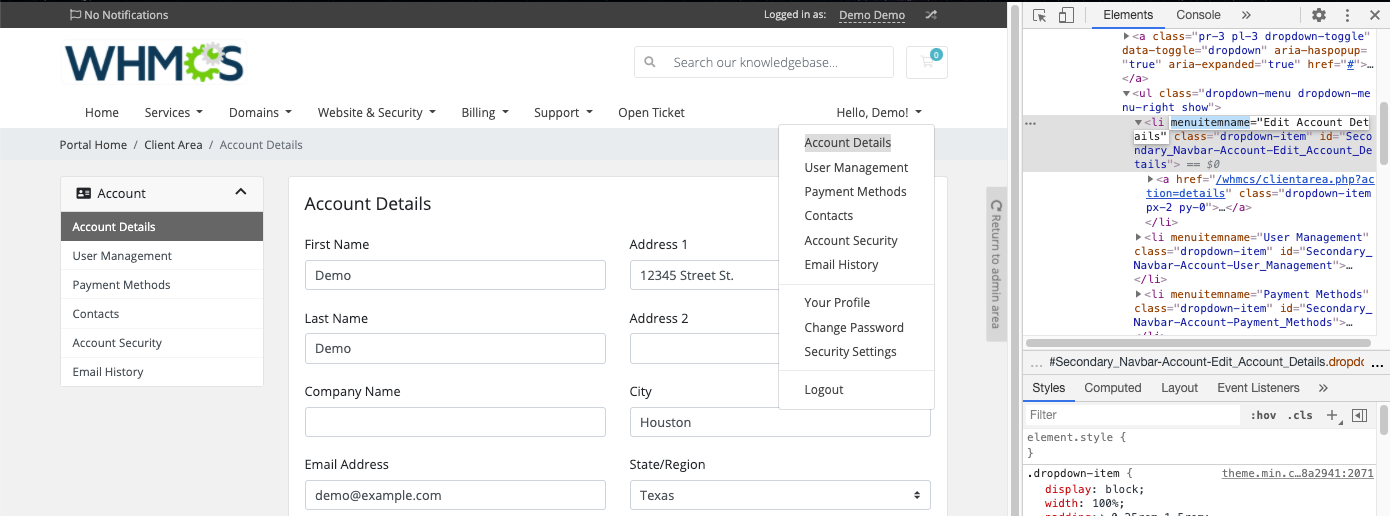
Once you have the menu item name that you wish to manipulate, which in the example above is Account Details, you can manipulate it as described below.
The client area’s menu system is defined in a tree structure. Each menu item has one parent item and can have many child items. To manipulate a menu item within a sidebar panel, you first need to retrieve the parent menu item, which in the case above is Account, followed by the Account Details menu item within it.
Changing the Text Label of a Menu Item
All sidebar menu items that are supplied by default use display names controlled by language files. Simply search in your active language file for the text you see in the menu item label, and you can adjust or change it there as required.
Alternatively, you can manipulate the display text via a hook as follows:
<?php

use WHMCS\View\Menu\Item as MenuItem;

add_hook('ClientAreaPrimarySidebar', 1, function(MenuItem $primarySidebar)
{
    $primarySidebar->getChild("My Account")
        ->getChild("Billing Information")
        ->setLabel("Custom Text Here");
});
The above example retrieves the My Account menu item, followed by the Billing Information menu item, which is a child within that. The same logic should be applied to all dropdown menu items.
Changing where a Menu Item Links To
You can change where a menu item points using the setUri method. For example, if you use an external system to control announcements, you could do something like the following:
<?php

use WHMCS\View\Menu\Item as MenuItem;

add_hook('ClientAreaPrimaryNavbar', 1, function (MenuItem $primaryNavbar)
{
    $navItem = $primaryNavbar->getChild('Support');
    if (is_null($navItem)) {
        return;
    }

    $navItem = $navItem->getChild('Announcements');
    if (is_null($navItem)) {
        return;
    }

    $navItem->setUri('https://www.example.com/3rdpartyblogsystem');

});
Rearranging Menu Items
You can change the display order of menu items as follows:
<?php

use WHMCS\View\Menu\Item as MenuItem;

add_hook('ClientAreaPrimaryNavbar', 1, function (MenuItem $primaryNavbar)
{
    $navItem = $primaryNavbar->getChild('Support');
    if (is_null($navItem)) {
        return;
    }

    $navItem = $navItem->getChild('Announcements');
    if (is_null($navItem)) {
        return;
    }

    $navItem->setOrder(1);

});
The following helpers are also available:
// Moves a menu item up one position
$primaryNavbar->getChild('Support')->getChild('Announcements')->moveUp();
// Moves a menu item down one position
$primaryNavbar->getChild('Support')->getChild('Announcements')->moveDown();
// Moves a menu item to the first position
$primaryNavbar->getChild('Support')->getChild('Announcements')->moveToFront();
// Moves a menu item to the last position
$primaryNavbar->getChild('Support')->getChild('Announcements')->moveToBack();
Adding a Menu Item
You can add a new link to the primary navigation as follows:
<?php

use WHMCS\View\Menu\Item as MenuItem;

add_hook('ClientAreaPrimaryNavbar', 1, function (MenuItem $primaryNavbar)
{
    $primaryNavbar->addChild('Menu Name')
        ->setUri('https://www.example.com/')
        ->setOrder(70);
});
Adding an Additional Child Menu Item
You can add additional menu items as follows:
<?php

use WHMCS\View\Menu\Item as MenuItem;

add_hook('ClientAreaPrimaryNavbar', 1, function (MenuItem $primaryNavbar)
{
    if (!is_null($primaryNavbar->getChild('Support'))) {
        $primaryNavbar->getChild('Support')
            ->addChild('Emergency Contacts', array(
                'label' => Lang::trans('emergencyContacts'),
                'uri' => 'emergency.php',
                'order' => '100',
            ));
    }
});
To add a menu item conditionally based on client login status, you can do that using menu context as follows:
<?php

use WHMCS\View\Menu\Item as MenuItem;

add_hook('ClientAreaPrimaryNavbar', 1, function (MenuItem $primaryNavbar)
{
    $client = Menu::context('client');

    // only add menu item when no client logged in
    if (is_null($client)) {
        $primaryNavbar->addChild('Example')
            ->setUri('https://www.example.com/')
            ->setOrder(100);
    }
});
Hiding or Removing a Menu Item
You can remove a menu item as follows:
<?php

use WHMCS\View\Menu\Item as MenuItem;

add_hook('ClientAreaPrimaryNavbar', 1, function (MenuItem $primaryNavbar)
{
    if (!is_null($primaryNavbar->getChild('Support'))) {
        $primaryNavbar->getChild('Support')->removeChild('Announcements');
    }
});